
Dressmaker Pattern Cutting: Grain, Bias and the Quality Score
How layout and cutting set your Dressmaker quality score, why grain and bias are both valid, how to fit more pieces per metre, and what a red outline means.

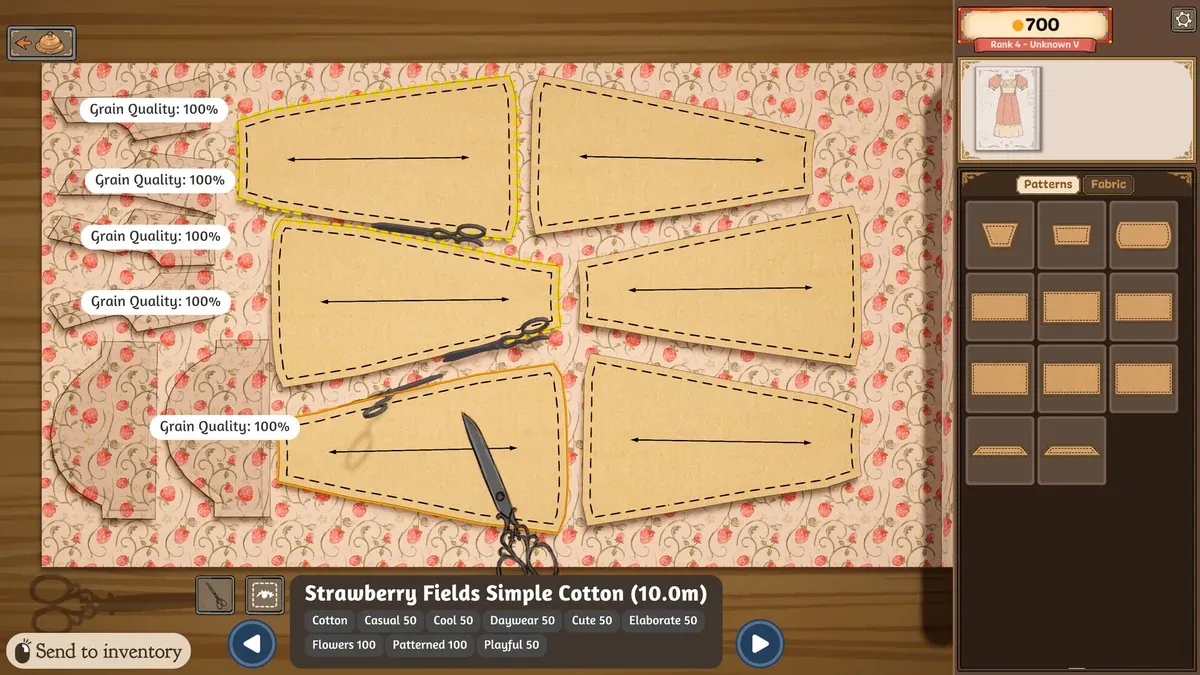
Cutting in Dressmaker is two separate jobs. Layout decides quality — the game states on screen that aligning the grain line horizontally produces a higher quality garment. Cutting decisions decide your profit — every paper piece has to fit inside the fabric you already paid for. Both grain and bias are correct answers, because the customer’s tags, not one universal rule, decide which one scores.
The official store page says it in its own words. Whether your pattern follows the grain or is cut on bias, your arrangement and cutting decide what appears on the final dress. That sentence is the whole design of the stage. There is no single optimal layout to memorise.
Grain and bias are two different answers, not right and wrong
The grain is the direction the threads run in the fabric. Aligning each paper piece with it keeps the garment hanging predictably, and the cutting screen rewards it directly. A creator who sews in real life said on camera that sewing with the grain matters, because otherwise the drape goes wrong.
Bias cutting means cutting across the grain at an angle. A bias-cut skirt exists as its own pattern option in the sketchbook. It sits alongside the straight long skirt and the pencil skirt. Reviewers describe the system as tag-driven: a dress meant to be glamorous scores differently from one meant to look plain. The two call for different silhouettes.
So the practical rule is the customer’s panel. Read the tags, pick the silhouette that matches them, then align the grain on whichever pieces you cut straight.
The quality score is built from several stages, not one
Quality accumulates as you work. Cutting warns you about the grain line, the sewing stage tracks accuracy per seam, and the assembled dress gets an overall figure. The game also ships an achievement for reaching 100% quality on a single dress, which tells you the ceiling is real and reachable.
What the game does not publish is the weighting. No official source breaks the score into percentages, and none of the guides published by other sites has verified one either. Treat any figure you see for “how much grain is worth” as unsourced.
A layout routine that keeps fabric in reserve
Every panel costs metres, and metres cost gold. One creator learned this the hard way when she bought a single expensive fabric and ran out mid-dress, then could not afford more.
- Sketch first, buy second. The sketchbook tells you how many pieces the silhouette needs before you visit the Emporium.
- Buy slightly more than the estimate. A creator was told on screen to get at least five metres so leftovers remain useful. Buyers who cut it fine end up restarting.
- Place the big pieces first. Skirt panels are the largest and the least flexible. They set the layout.
- Fill the gaps with the small pieces. Collars, cuffs and sleeves tuck into the odd shapes left between the skirt panels.
- Trim the roll, not the piece. You can cut away the top edge of the fabric roll to open up space. That is cheaper than buying another metre.
- Check the colour combination in the sketchbook first. The pencil tool lets you test combinations before committing gold.
Re-cutting one panel beats restarting the dress
The safety net here is generous, and knowing about it saves both money and time.
- Re-cut: a panel you already cut can be marked for re-cutting if you dislike the fabric.
- Dispose: an unneeded cut piece can be thrown away, and the fabric it used comes back.
- Remove and re-cut: a panel already sewn onto the dress can be pulled off, taken back to the cutting table and cut again.
- Restart: a whole dress can be rebuilt from the sketch stage if the customer rejects it.
A recorded first look used all four. The creator re-cut single pieces, changed one panel into a patterned fabric for contrast, and after two rejections started a dress from scratch. Her third attempt succeeded.
What a red or orange outline means
Players report that a cut piece sometimes shows an orange or red outline. A Steam discussion thread is titled exactly that, and prototype-era comments describe a related oddity: when a piece is re-cut, the grain guide lines stop showing.
Neither has an official explanation, and there is no repeatable set of steps published anywhere. What is safe to say is what to check first:
- Whether the piece has already been cut or disposed, so the game is flagging a duplicate.
- Whether the piece currently sits outside the fabric area.
- Whether you are looking at a re-cut, where the grain guides may simply be missing.
If the dress still assembles and delivers, treat it as cosmetic and carry on. If it blocks you, it belongs in the official Discord or the Steam discussion board rather than in a review.
Where the other decisions live
Fabric shopping, measurements and the full commission order are on the beginner guide. The sewing stage and the argument about skipping it are on the sewing guide. Selling dresses without a customer is on the off the rack page.